|
COMBINED ATTACK
Автор: Юрий Авербах, на английском языке.
Second lecture of the education program «Improve your chess now!» is
about the combined attack.
In the course of a game the warring sides endeavour to inflict
material losses on each other, and with this aim they make attacks with
their pieces and pawns on the pieces and pawns of the opponent.
But a simple attack on an enemy piece rarely proves effective. For
this happen it has to be incapable of being defended or covered by its
own pieces, or and of moving out of the attack.
Quite a different matter is a combined attack, normally carried out by
several pieces or pawns, when one of them attacks the opponent’s piece,
and the others prevent it from moving or being defended. In such
situations it often happens that the withdrawal squares of the piece are
cut by its own pieces or pawns.
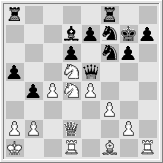 This
position occurred in a game Averbakh-Boudi-Bueno (Polanica Zdroi, 1975). This
position occurred in a game Averbakh-Boudi-Bueno (Polanica Zdroi, 1975).
I played 1.f4! Q:e4 2.Re1, and the black queen was trapped. After
2...e6 3.N:f6 Black resigned.
Next position is taken from a game Nimzowitsch-Alekhine (Bled, 1931).
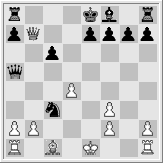
Here all White’s hopes rest on his attack at the rook a8, but Alekhine
found a refutation of his plan:
1...Nd5+ 2.Bd2 Qb6! 3.Q:a8+ Kd7, and the white queen is trapped. After
4. 0-0-0 Nc7 5.Ba5 N:a8 6.B:b6 N:b6 Black won.
In this position, the conclusion to a study by L.Kubbel (1940) Black
does not look to be in any particular danger.
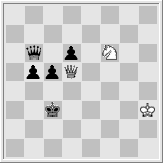 But
White to move and after 1.Qa8! Kb2 2.Nd5 he managed to deprive the queen
of all eight free squares. But
White to move and after 1.Qa8! Kb2 2.Nd5 he managed to deprive the queen
of all eight free squares.
Note the negative role played here by the black pawns, which
significantly restrict the freedom of their own queen.
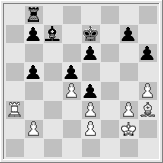 This
position occurred in a game Andersson-E.Torre (Biel, 1977). This
position occurred in a game Andersson-E.Torre (Biel, 1977).
White played 1.Rb3, reckoning on regaining his pawn, but after 1...b4!
2.R:b4 b5 3.h5 Bd6 4.Rb3 b4 his rook was trapped. By continuing 5...Re8
followed by taking his king to c4, Black won.
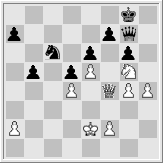 Next
position is taken from a game Matulovic-Cvetkovic (Varna, 1965). Next
position is taken from a game Matulovic-Cvetkovic (Varna, 1965).
Here White’s first move 1.Qc1 looks incomprehensible, and Black
decided to win the opponent’s central pawns by 1...N:d4+ 2.Kd3 Q:e5. But
White had calculated accura-tely: 3.Qc8+ Kg7 4.Qh8!+ Q:h8 5.N:f7+ Kg7
6.N:e5, and the black knight had to retreat.
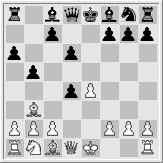 In
one of the variations of the Ruy Lopez after 1.e4 e5 2.Nf3 Nc6 3.Bb5 a6
4.Ba4 d6 5.d4 b5 6.Bb3 N:d4 7.N:d4 ed the following position is reached: In
one of the variations of the Ruy Lopez after 1.e4 e5 2.Nf3 Nc6 3.Bb5 a6
4.Ba4 d6 5.d4 b5 6.Bb3 N:d4 7.N:d4 ed the following position is reached:
Here 8.Q:d4 would be a mistake on account of 8...c5 9.Qd5 Be6 10.Qc6+
Bd7 11.Qd5 c4, when the white bishop is trapped.
In this examples considered the targets of the combined attack were
the queen, rook, knight and bishop.
But a king can also be subjected to a combined attack. I will give
several typical instances of an attack on the king, where the decisive
blow is landed by various pieces.
Of course, the most dangerous piece in the attack on the king is the
queen.
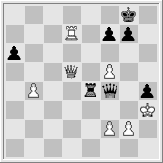 This
position occurred in a game Tarjan-Karpov (Scopje, 1976). This
position occurred in a game Tarjan-Karpov (Scopje, 1976).
White has created the threat of mate in two moves, but it is Black to
play, and he wins by 1...Re3+! 2.fg Q:g3 mate.
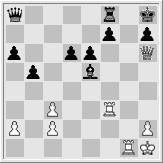 In
this position, taken from a game Soultanbiev-Colle (Liege, 1926), by
pinning the rook at f3 Black assumed that he defended against all the
threats. In
this position, taken from a game Soultanbiev-Colle (Liege, 1926), by
pinning the rook at f3 Black assumed that he defended against all the
threats.
But after 1.Rg2! it transpired that the rook could not be taken on
account of 2.Q:f8 mate and meanwhile 2.Q:h7+ K:h7 3.Rh3 mate was
threatened.
Following position occurred in a blindfold exhibition of Pillsbury
(1899).
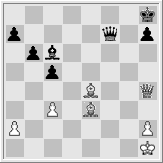 Here
Black (Pillsbury) gives mate with a lone bishop, only first he has to
restrict the enemy king: 1...Qf1+ 2.Bg1, and now 2...Qf3+! 3.B:f3 B:f3
mate. Here
Black (Pillsbury) gives mate with a lone bishop, only first he has to
restrict the enemy king: 1...Qf1+ 2.Bg1, and now 2...Qf3+! 3.B:f3 B:f3
mate.
As we can see, in the final mating position the task of restricting
the king is fulfilled by pieces of the same color. Picturesquely
speaking, they as though go over to the opponent’s side, by hindering
their king.
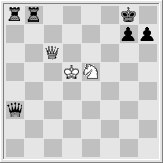 A
similant situation arises when mate is given by a lone knight. A classic
example is so-called «smothered» mate, which has been known since the
late 13th century. A
similant situation arises when mate is given by a lone knight. A classic
example is so-called «smothered» mate, which has been known since the
late 13th century.
This position was given in a book of Lucena (1497), White to play
gives mate in five moves: 1.Qe6+ Kh8 2.Nf7+ Kg8 3.Nh6++ Kh8 4.Qg8+! N:g8
5.Nf7 mate.
Mate by a pawn occurs most often in the endgame. Here is one of the
rare examples of a mate of this type in the middlegame, which occurred
in a game Georgadze-Kuindzhi (Tbilisi, 1973).
In this unusual position both kings are in danger, but it is Black to
play, and he is the first to give mate: 1…Qf2+! 2.Q:f2 Rh5+! 3.B:h5 g5
mate.
At the last lecture I gave you a study to solve.
Can anybody from you show us a solution of it?
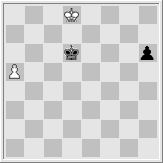
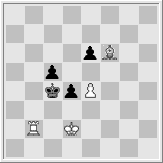
As a homework I would like to give you following problem to solve.
OnLine игра на нашем сайте

|
|
|
|